

Key Takeaways
A well-chosen rack can add useful carrying capacity without making every trip feel like a compromise.
- Confirm your Model Y configuration and mounting points before ordering.
- Match the rack style to the gear you actually transport.
- Stay within the lowest applicable vehicle, rack, and accessory limit.
- Install on a clean roof and follow the supplied sequence precisely.
- Remove the rack when you do not need its added capacity.
Understand Tesla Model Y roof rack compatibility
Tesla Model Y roof racks sit close to a large glass roof, so fitment deserves more attention than a simple crossbar measurement. Model year, roof configuration, mounting hardware, and accessory compatibility all matter. A rack that looks similar in a photograph may still use different pads or attachment points. Treat the vehicle identification and installation instructions as part of the purchase, not as afterthoughts.
Differences between Model Y generations and configurations
Model Y vehicles can differ by production period, market, trim, and refresh. Those differences may affect the supplied hardware, the roof markings, or the way a rack interfaces with the vehicle. Do not assume that a rack listed for one year automatically fits every other version. Compare the seller’s fitment list with the vehicle identification details and, if uncertain, ask for confirmation before opening the package.
Factory roof glass and mounting-point considerations
The glass roof is not a cue to improvise. Roof rack systems designed for the Model Y use defined mounting locations, often identified by marks or arrows in the glass and supported by receivers beneath it. The surface should be clean and dry, and protective tape or pads must sit exactly where the instructions specify. Small alignment errors can create uneven pressure, movement, or damage during a trip.
OEM Tesla racks versus third-party systems
An original-equipment rack may appeal when you want documentation closely tied to the vehicle, while a third-party system can offer different bar shapes, accessories, or pricing. The sensible comparison is not only the headline load rating. Check the complete kit, installation method, lock arrangement, replacement parts, warranty, and compatibility with the equipment you already own. A lower purchase price is less useful if the required adapters cost more later.
How to verify fitment before buying
Start with the vehicle’s model year and configuration, then check the rack’s exact application rather than relying on a generic “Model Y” label. Confirm that the package includes all pads, clips, fasteners, and keys, and look for restrictions on panoramic glass roofs. This Model Y roof rack guide is a useful place to review non-drilling installation, load limits, and accessory compatibility before comparing listings.
Compare the main types of roof rack systems
The best system depends on what needs to leave the cabin and how often it travels. Crossbars are the usual starting point because they support many accessories, but a platform or a specialized cradle may be easier for bulky outdoor equipment. A hitch-mounted rack can also be more convenient when roof access is awkward. Think about loading height, storage space, and the number of times you will install or remove the setup.

Crossbars for bikes, skis, and cargo boxes
Crossbars provide a foundation for bike trays, ski holders, cargo boxes, and other attachments. They work well when your gear changes from trip to trip, provided each accessory clamps or connects to the bar profile. Measure the accessory’s required bar spread and check that doors, glass, antennas, and the rear liftgate have adequate clearance before loading.
Platform racks for flexible gear mounting
A platform offers a broader mounting surface and can make it easier to position unusual equipment. It may suit owners who carry several smaller items or need multiple attachment locations. The trade-off is usually extra weight, more exposed hardware, and potentially greater wind resistance. Consider whether that flexibility will be used often enough to justify the added bulk.
Specialized mounts for kayaks and sports equipment
Kayak saddles, cradles, ski holders, and board mounts are shaped around particular types of equipment. They can reduce shifting and make tie-down points easier to reach, but only when the bar spacing and accessory capacity are correct. Padding should protect the gear without replacing proper straps. For a broader look at roof boxes and non-factory options, this Model Y cargo discussion offers useful questions to ask before buying, though individual forum experiences are not universal fitment advice.
When a hitch-mounted rack is the better option
A hitch-mounted rack keeps heavy items lower and can be easier to load than a roof system. It may be preferable for frequent bicycles or gear that is awkward to lift overhead. It can reduce roof noise, but it may obstruct the rear view, sensors, liftgate, or access to the cargo area. Check the vehicle and hitch limitations separately, and remember that a hitch rack is not a substitute for a roof rack when you need enclosed overhead storage.
Choose the right Tesla Model Y roof rack
Choosing among Tesla Model Y roof racks becomes simpler when the decision starts with use rather than appearance. Write down the heaviest item, the longest item, and the accessory you are most likely to use. Then compare the rack’s limits and dimensions against those real measurements. Fitment comes before convenience, because a beautifully finished rack is still the wrong choice if it cannot carry your equipment safely.
Matching the rack to your cargo and trips
A commuter who occasionally carries skis has different needs from someone hauling boards every weekend. A cargo box favors secure, enclosed storage, while bikes and kayaks need purpose-built contact points. Consider how often you will load the rack, whether you can lift the equipment alone, and where the rack will live between trips. Those practical details often narrow the choice faster than brand styling or color.
Evaluating weight ratings and load distribution
Read the limits for the vehicle, rack, crossbars, and accessory, then use the lowest applicable figure. The total includes the rack and attachments, not only the cargo. Weight should be spread across the permitted mounting area rather than concentrated at one point. A load that is technically under the maximum can still be unsuitable if it is long, unstable, or poorly distributed.
A simple comparison table can keep the purchase grounded in the job the rack must perform:
| System type | Best suited to | Main advantage | Main caution |
|---|---|---|---|
| Crossbars | Mixed accessories | Broad compatibility | Requires separate attachments |
| Platform | Varied or small gear | Flexible mounting | May add weight and drag |
| Specialized mount | Kayaks, skis, or boards | Shaped support | Narrower use case |
| Hitch rack | Frequent bicycles | Low loading height | Can affect rear access |
The table is only a starting point. Confirm the specific accessory’s instructions and the vehicle’s published limits before treating any general category as a guarantee.
Comparing aerodynamics, noise, and efficiency
Every roof attachment changes airflow, even when the vehicle is empty. Bar shape, fairings, accessory position, and loose straps can influence noise and energy use. A box or upright bike usually presents more surface area than bare crossbars. If efficiency matters, remove unused attachments and compare the setup over familiar routes rather than trusting a single short drive.
Checking materials, locks, warranties, and price
Aluminum and composite components can keep weight manageable, while steel hardware may contribute strength and a different feel during installation. Inspect the finish, seals, key system, spare-part availability, and warranty terms. A useful price comparison includes adapters, locks, replacement pads, and shipping. For another example of how a complete kit may be described, see this aluminum Model Y roof rack, then verify its stated fitment independently for your vehicle.
Install Tesla Model Y roof racks safely
Installation is a controlled fitting exercise, not a job to rush before departure. Work in a dry, well-lit place with the vehicle parked on level ground. Keep the instructions, measuring tools, cleaning supplies, and every small fastener together. The rack should never be used to compensate for uncertain fitment or damaged mounting hardware.
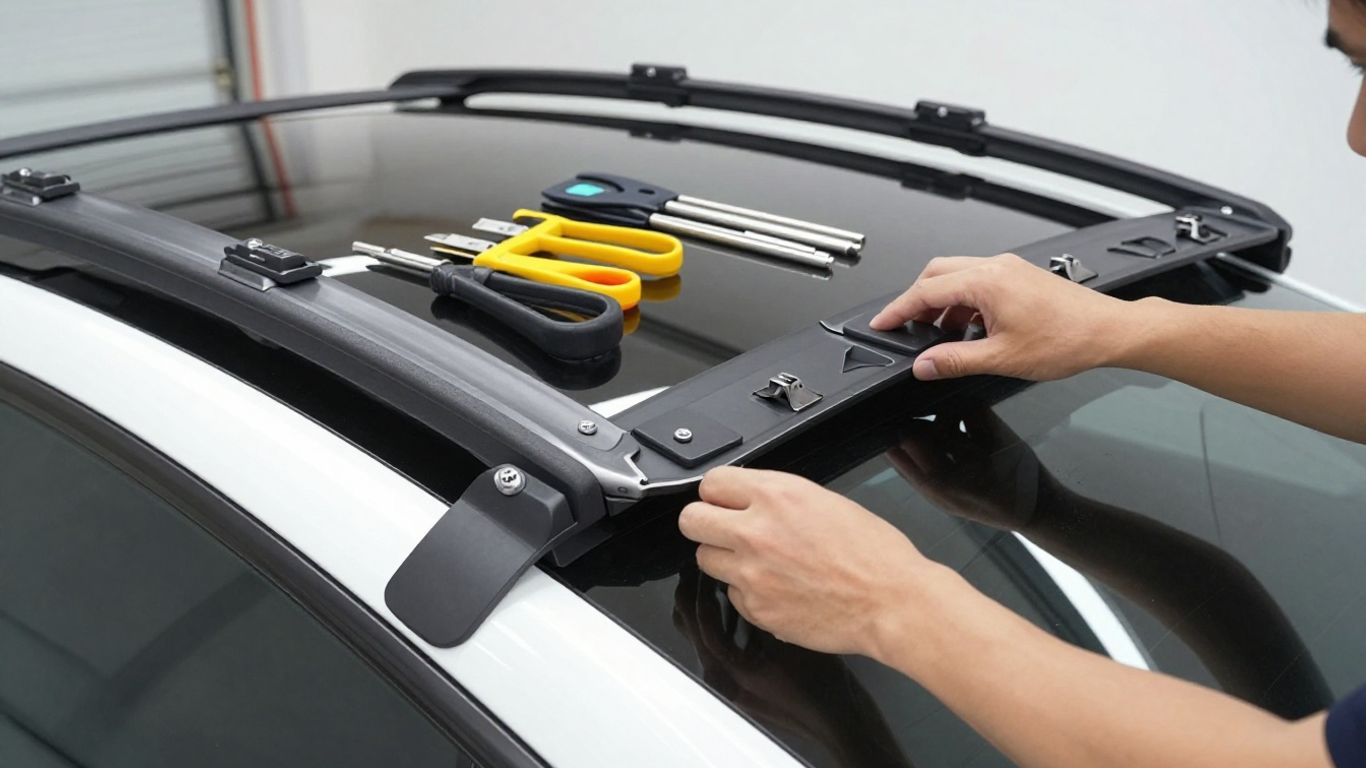
Preparing the vehicle and mounting surfaces
Wash and dry the roof around the mounting locations, removing grit that could sit beneath a pad or protective strip. Inspect the glass, seals, clips, and contact surfaces before installing anything. If the instructions call for anti-abrasion tape, apply it to the specified positions and smooth out wrinkles. Avoid dragging pads or feet across the roof while positioning them.
Following the manufacturer’s installation sequence
Use the supplied sequence rather than assembling the rack in whatever order seems quickest. Typical steps may include identifying each corner, exposing the receiver, engaging clips, placing the matching pads, and then fitting the crossbars. This roof rack installation guide covers cleaning, protective tape, rail clips, pads, and crossbar alignment in a step-by-step format. Read it alongside the instructions for the exact kit in your hands.
Tightening hardware without damaging the roof
Tighten fasteners evenly and only to the specified setting. If a torque tool or built-in indicator is provided, use it instead of guessing by feel. Excess force can damage hardware, seals, or the mounting area; insufficient force can allow movement. Stop if a component binds, sits crooked, or requires unusual pressure, and resolve the cause before continuing.
Confirming alignment and rack stability
Before loading gear, check that every foot sits flat, every hook or clip is fully engaged, and the bars are parallel and centered. Apply gentle hand pressure from several directions and listen for movement or contact with the glass. Lock covers should close normally, and doors and the liftgate should operate without interference. A short unloaded drive followed by another inspection is a sensible final check.
Load and transport gear responsibly
A secure installation can still become unsafe if the load is poorly arranged. Start with the accessory instructions, then place the cargo so it stays within the rack’s footprint and does not interfere with doors, glass, or the liftgate. Use straps and locks that suit the equipment rather than relying on elastic cords. Recheck everything after the first few miles.
Positioning cargo for balance and clearance
Keep dense weight low and centered between the permitted support points. Long items should be aligned with the vehicle and supported at the locations specified by the accessory maker. Leave clearance for the roof, liftgate, spoiler, and nearby vehicles. If one end of a board or kayak extends substantially beyond the vehicle, use the required warning or support measures for the road conditions and jurisdiction.
Securing bikes, boxes, boards, and other equipment
Use the rack’s frame clamps, wheel straps, saddles, or box attachments as designed. A cargo box should close fully and its contents should not press against the lid. Bikes need protection for frames, wheels, and contact points, while boards and kayaks need multiple restraints suited to their shape. Tie down loose straps so they cannot flap against paint or enter moving parts.
Respecting vehicle, rack, and accessory limits
The weakest limit governs the trip. Include the rack, feet, platform, box, and any adapter in the total, and follow separate limits for dynamic travel and storage where provided. Do not use a roof rack to carry an item simply because it fits physically. If the accessory’s instructions conflict with a vehicle restriction, stop and choose a different arrangement.
Adjusting driving for height, wind, and handling
A roof load raises the vehicle’s overall height and can alter crosswind response, braking feel, and cornering. Allow extra space under garages and low branches, reduce speed when conditions are unsettled, and leave more following distance. Listen for new vibration or repeated tapping. Pull over safely if anything shifts, then inspect rather than continuing on assumption.
Maintain and troubleshoot your roof rack
Roof racks experience weather, vibration, temperature changes, and repeated loading. A quick inspection before each trip is more useful than waiting for a visible failure. Keep a note of unusual noise, movement, or damaged padding so a small issue does not become an expensive roof or cargo repair.
Inspecting mounts, fasteners, and contact points
Look for loose covers, displaced pads, cracked plastic, bent hardware, and marks around the mounting points. Check that fasteners remain seated and that clips have not rotated or pulled away from their receivers. Run a hand along accessible contact areas only when the vehicle is stationary and cool. Replace questionable parts rather than relying on a temporary tightening fix.
Preventing scratches, corrosion, and water intrusion
Clean dirt from pads and mounting areas before refitting the rack. Do not trap wet debris beneath protective strips, and inspect seals after heavy rain or a wash. Rinse salt and road film from exposed metal, then dry the components according to their care instructions. If you notice persistent moisture, damaged sealing material, or glass damage, remove the rack and seek qualified advice.
Reducing wind noise and vibration
Noise often comes from an empty bar, a loose cover, an incorrectly seated pad, or a strap vibrating in the airflow. Recheck alignment and close every cover, then remove unused attachments when possible. Small changes in accessory position can alter the sound, but never sacrifice the specified mounting position just to make the cabin quieter.
Knowing when to remove or replace the rack
Remove the system when it is not needed, especially if the vehicle spends time in a low-clearance garage or exposed coastal conditions. Replace components that are cracked, corroded, distorted, or missing their locking function. A rack that has moved during a trip should not return to service until the cause is understood and the relevant parts have been checked.
Decide whether roof racks are right for your Model Y
Roof storage is valuable when interior space is limited or when bulky equipment needs a stable home outside the cabin. It is not automatically the best answer for every load. The right decision balances carrying capacity with lifting effort, noise, energy use, storage, and how often the equipment travels. A simpler setup may serve better than a permanent one.
Situations where roof storage adds the most value
Roof racks make sense for long, narrow, dirty, or wet equipment that would be awkward inside. They can preserve passenger and cargo-room space during camping, sports, or home-improvement trips. Frequent users may appreciate leaving a compatible attachment ready to go, while occasional users may prefer installing the system only for a planned journey.
Trade-offs compared with trunk and hitch storage
Interior storage protects gear from some weather but uses passenger space and may bring dirt into the cabin. Hitch-mounted storage is lower and often easier to load, yet it can affect rear access and visibility. Roof storage keeps the rear area available, but it requires overhead lifting and introduces height and airflow concerns. Compare the complete task, not just the advertised capacity.
How roof racks affect range and everyday usability
Added weight and aerodynamic drag can increase energy consumption, particularly with bulky accessories or exposed cargo. Noise may be noticeable even when the bars are empty. Removing unused equipment helps restore the vehicle’s normal profile, while thoughtful loading can reduce unnecessary resistance. The practical effect depends on speed, weather, route, and the shape of the load.
A practical checklist before your first trip
Before leaving, walk around the vehicle and confirm the essentials in a consistent order:
- Verify that the rack and accessory match the vehicle configuration.
- Check every pad, clip, fastener, lock, and cover.
- Weigh the complete load and compare it with the lowest limit.
- Secure cargo, loose straps, doors, and box contents.
- Reinspect after a short distance and after significant weather changes.
This short routine catches many problems while they are still easy to correct. Keep the rack instructions and a few spare straps with your travel equipment, and do not hesitate to turn back if the load begins to move.
Conclusion
Tesla Model Y roof racks can be a practical way to carry bulky equipment, but the best result comes from careful fitment, measured loading, and regular inspection. Choose around your real gear, install every component as directed, and remove the system when its benefits no longer outweigh the added height, noise, and airflow. That approach keeps the extra capacity useful without treating convenience as a substitute for safe setup.
Frequently Asked Questions
Can any roof rack fit a Tesla Model Y?
No. Fit depends on the vehicle configuration, mounting locations, rack hardware, and accessory requirements. Confirm the exact application before buying.
Do roof racks damage a glass roof?
A correctly fitted system should use its specified mounting points and protective components. Damage becomes more likely when grit, misalignment, excess tightening, or incorrect hardware is involved.
Should roof racks stay installed all year?
Not necessarily. Removing an unused rack can reduce noise, drag, exposure to weather, and clearance concerns. Store it clean and dry when it is off the vehicle.
How much weight can a roof rack carry?
The permitted load is determined by the lowest applicable limit among the vehicle, rack, feet, crossbars, and accessory. Include the rack and attachments when calculating the total.
Are roof boxes better than open crossbars?
A roof box can enclose and protect luggage, while open crossbars are usually more flexible for bikes, boards, and specialized mounts. The better choice depends on cargo shape, security, access, and aerodynamic trade-offs.
How can roof rack wind noise be reduced?
Check alignment, covers, pads, and fasteners, and remove unused attachments. Loose straps and exposed accessories are common sources of vibration and noise.
What should I do if the rack moves during a trip?
Pull over safely, unload or stabilize the cargo, and inspect the mounting points and hardware. Do not continue until the cause is identified and the system is correctly secured.